Introduction & Complete Guide to ISO in Photography

Taking a perfect shot needs lots of practice and dedication. You need to take care of various factors but among all, you should know how to use camera settings & its elements.
There are mainly three major settings or elements that help to get the perfect shot. The first two are Shutter Speed and Aperture, whereas the last one is ISO in photography.
So, what exactly is ISO in Photography?
There is no proper definition of ISO, however, the ISO stands for International Organization of Standardization. It is the governing body that monitors the camera sensor and helps to standardize sensitivity ratings.
This is very important as the standard of sensitivity allows you to shoot the same ISO on different cameras. While their value and exposure will always be equal. The origin of ISO comes from the film industry and was known with the term "Film Speed" or "ASA".
Besides, it can be described as the camera setting that controls the brightness and darkness of the photo. The higher the ISO number, the higher the brightness of the photos and vice versa. ISO in photography is extremely important as it helps to get sharp images in a dark environment.
However, you should be careful with the ISO setting and it has consequences. The photos taken from the high ISO will result in a lot of grain in the photographs, also known as noise.
Let's look at common values of ISO.
Every camera comes with different ranges of ISO value also known as ISO speeds. Here is the common ISO value that is frequently used to control the brightness of the images.
- ISO 100 (IoW ISO): It is the lowest level of ISO which gives pretty dark image.
- ISO 200
- ISO 400
- ISO 800
- ISO 1600
- ISO 3200
- ISO 6400 (High ISO): This is taken as the highest range of ISO level.
While going from ISO 100 to 200, the value of ISO has been doubled. So, the photo taken in ISO 200 will be twice brighter than the image taken from ISO 100. The low ISO also renowned as "base ISO" is the key to the perfect shot. It helps to produce the highest image quality with low or no noise. But ISO 100 may not be the perfect setting when you are in dark environments. We will talk about when to use the low ISO and high ISO, but before that let's jump into the low vs high noise.
Visibility of Low and High Noise
First of all, Noise is the visual distortion that hinders or ruins the beauty of the photographs. There are various factors which cause the grain and noises in photographs. However, the use of high and low ISO is the major one.

Picture: photographylife.com
Look at the above image. The first picture is shot on the ISO setting 200 while the other is on ISO 3200. The picture taken in ISO 200 is sharp and noise free. Whereas, the picture taken from ISO 3200 has a lot of noise and distortion.
It's better to stick with low ISO level until the environment demands the high ISO level. So, how do you know where to use low and high-level ISO?
Let's look at both low ISO and High ISO one by one.
The use of low ISO
Just stick with the low ISO (base ISO) as much as you can. The ISO 100 or ISO 200 is taken as the low ISO or base ISO. If your surrounding has enough light, then go for ISO 100, it will give you the sharp image as well it will be noise free.
If you are looking for some long exposure shot, then low ISO can be a good option. However, you should avoid camera shake and it's better if you can use the tripod. Note that, long exposure shot gives motion to any object. The introduction of camera shake on long exposure ruins the beauty of the shot.
Look at the below image. It is shot at the low base ISO i.e. ISO 100 and long exposure shutter speed 25s. The environment is pretty dark while the lights and motion are sharp & noise free.

If you own a DSLR camera or latest smartphones, try clicking with this setting.
The use of High ISO
Try to go for low base ISO as much as you can, but there are a certain situation where you need to level up your ISO setting. Generally raising the ISO scale is quite related to the fast shutter speed. And hence it applicable while capturing the fast moving object or simply freeze the object which is in motion.

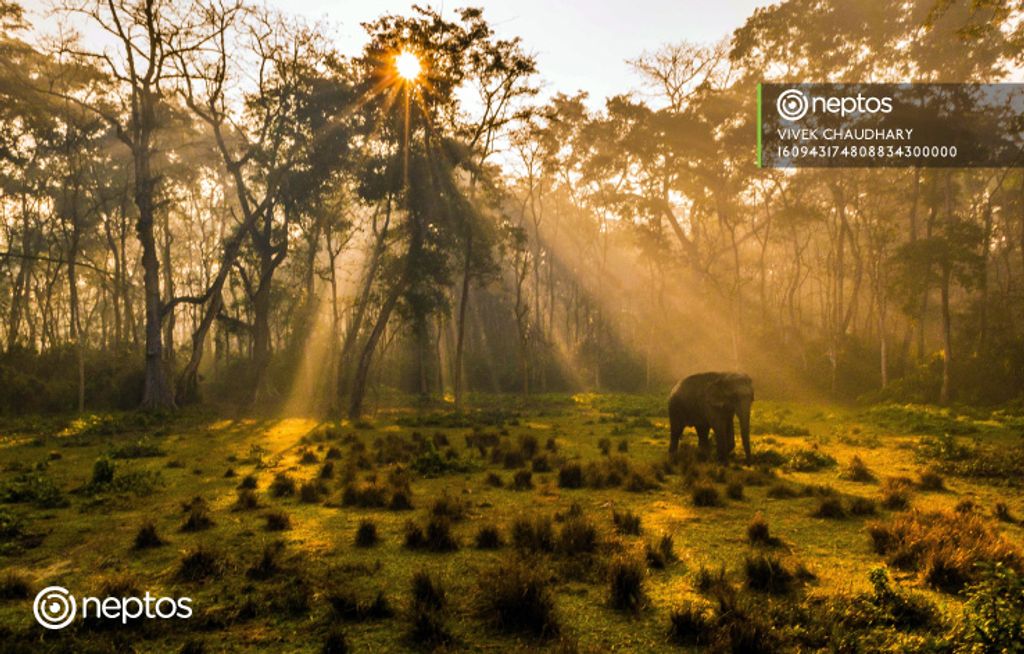
For example, look at this migrating bird captured with the ISO setting 1600 and Shutter Speed 1/1250s and Aperture f/5.6.
Isn't that beautiful? The photographer has captured enough natural light by using the ISO setting 1600 and Shutter Speed 1/1250s. Whereas, the image is completely noise free.
To sum up, you should go for higher ISO only when there is not enough light for the camera to capture the sharp and bright photos.
How to minimize Noise in the Image
Many photographers believe that the best way to click the perfect sharp image with no noise is to use a base or low IOS. It might be true for many cases but it won't give you the desired shot every time. The use of ISO simply depends on the environment that you are trying to photographs.
If you are in a dark environment, the use of ISO 100 will give sharp but dark images. This setting might be the perfect option if you are trying to highlight the subject in low light environment. On the contrary, the high ISO will give a bright image even in the low lights. But you have to be careful as it gives noise and distortion in the image.
In order to minimize the noise in the image, try to go as low as possible. Since, it is not favorable every time, set your high ISO level to something like ISO 800, ISO 1600 and ISO 3200.
Tips to improve the quality of the picture using ISO setting
Among many, here are some of the few tips that will surely help to click quality image using ISO setting.
- Whenever you are going for low ISO, then stick with ISO 200. There's almost no difference between the shot taken from ISO 100 and ISO 200. However, the use of ISO 200 will allow using a faster shutter speed resulting in the quality and sharp image. Likewise, it will also help you to get into the depth of field by using a smaller aperture.
- If you love outdoor photography, then raise your ISO level to ISO 400 or even higher.
- Be experimental with high and low ISO.
- If you are going for indoor shoots, then go for the high ISO 1600 or ISO 3200.
Well, that's it. With these tips, we have come to an end of this Introduction & Complete Guide to ISO in Photography. Feel free to connect with us, if you have any confusion.
Till then, keep experimenting.
6 Pro Tips to level up your Travel Photography
Stock Photography - Understanding the Client Needs
How to get sharp and non-grainy photos in low light?
Subscribe to Our Blog
Stay up to date with the latest marketing, sales, and service tips and news.
Comments(0)